


Despite everything, we don’t have the idea what it’ll be called — what would it be able to be called? — yet Android Q is formally here, and its second beta is accessible now. In fact, it’s a developer preview, so it’s not prepared for prime time. So read on and how about we kick the gathering off.

- The simple way
- The harder way
- Going back to Android 9 Pie
Which phones are getting the last Android Pie form?
Starting today, there are six telephones accepting the Pie update legitimately or directly from Google:
- Pixel 3 XL
- Pixel 3
- Pixel 2
- Pixel 2 XL
- Pixel
- Pixel XL
Is there an extended Android beta program for non-Google devices like there was with Android P?
A year ago, surprisingly, Google included non-Pixel or Nexus devices as a component of its Android beta program. While Google will probably grow the Android Q beta to incorporate different devices, at this moment the program is constrained to Pixels. Remain tolerant, however!
The easy way — Android Beta Program
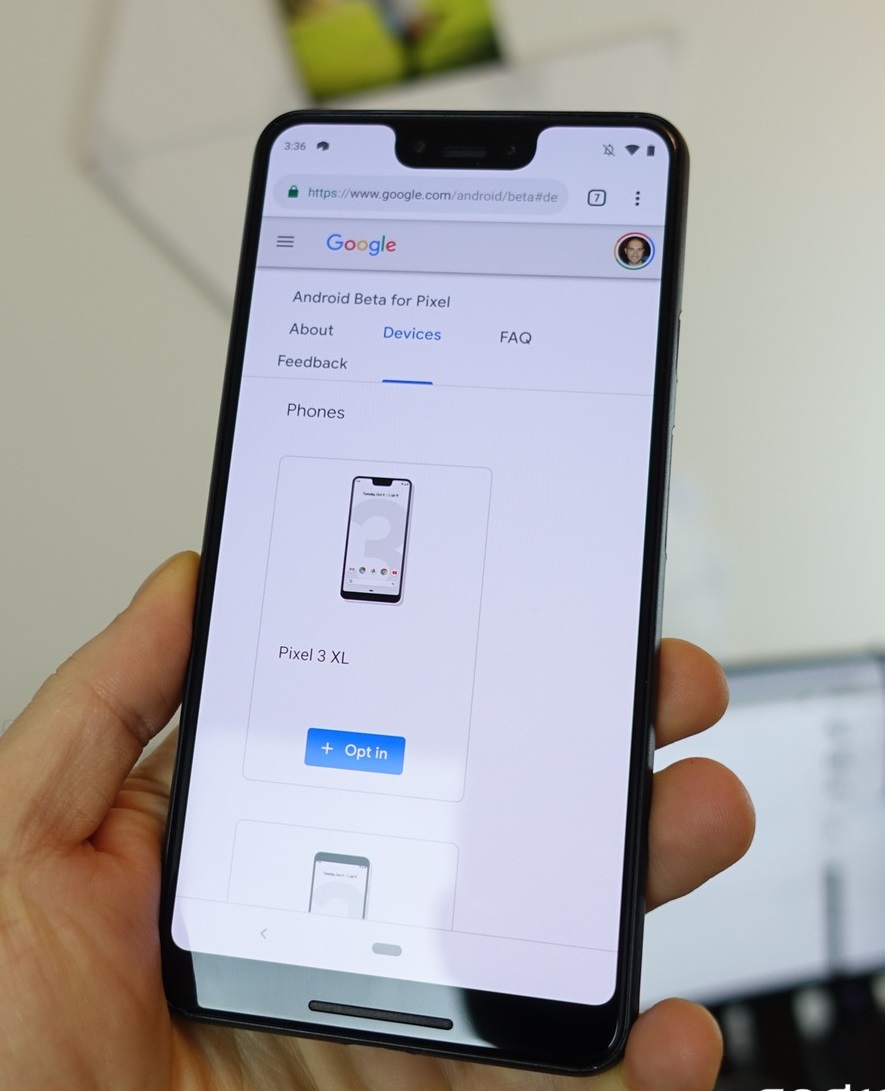

Basically, visit the Android Beta portal and pick into the beta, which will at that point brief Google to send your phone or tablet an over-the-air update. Depending upon the planning, your telephone will get the most recent beta and then OTA for the last version, or it will simply get the last version of Android Q.
- Head to Android Beta program portal on your Pixel phone.
- Sign into the Google account related to that phone.
- Scroll down to Your qualified devices.
- Find the device you need to join up with the Beta program and tap Opt-in.
- Follow the prompts on your phone to acknowledge the over-the-air download.
Imagine a scenario where I need to leave the beta program.
You can without much of a stretch quit the beta program by setting off to the same Android Beta portal as you did to enlist, scroll down to your phone, and tap Opt-out.
This is what Google says will happen when you do that:
You may quit the program whenever to come back to the steady, open version of Android. On the off chance that you quit when your device is running a beta variant of Android, all user information on the device will be cleaned. In the event that you stay selected until the finish of the program, you will move on from the program and get an update to the steady open arrival of Q. Your device won’t be cleaned.
While we don’t suggest doing it the most difficult way possible, beneath you’ll discover directions for downloading the Android Q beta utilizing the official processing plant pictures. Be careful with winged serpents!
The harder way — Flashing through a bootloader


If you need full oversight over your Android Q experience, you’ll have to go in through the secondary passage — you’ll have to flash the production line picture.
Before we experience the means of sideloading Android updates, it is firmly suggested that you have past information of working with the Android SDK(software development kit) and the Terminal (OS X or Linux) or Command Prompt (Windows), as it is conceivable to hurt your device if something somehow happened to turn out badly in the following procedure.
On the off chance that you have to download the Android SDK, you can snatch it from the Android Development site and follow their directions on the best way to introduce it accurately. For the following procedure, all you will require is the ADB and fastboot documents which are situated in the Platform Tools organizer, so try to peruse the description at the device webpage and get the privilege download.
Furthermore, all the following directions are composed as they would be in Terminal on a Linux or OS X stage. On the off chance that you are following this guide and utilizing a Windows machine, you won’t have to utilize the “./” found in the guide. Simply type the remainder command line by line in the order they are recorded and you’ll be great.
Empower developer settings and USB debugging
- Go to your Settings and look down to About Phone/Tablet.
- Tap on the Build number multiple times until the discourse box says you are currently a designer.
- Go back to the Settings menu and you should locate another alternative called Developer choices. Tap into the Developer alternatives.
- Make beyond any doubt that the engineer alternatives are turned on and that USB debugging is checked on.
- Plug your gadget into your PC and tap “alright” on the discourse box requesting that you Allow USB debugging while associated with the PC. You can also choose to dependably permit access on that PC.
Whenever done effectively, this will be all that you should do on your telephone or tablet for the occasion.
Opening your bootloader
Pixel phones purchased from Google straightforwardly have a bootloader you can open. On the off chance that you need to manually flash programming, you’ll have to do this.
To do this you should initially boot into your bootloader. You can either manually turn off your phone or tablet and hold down the power button and the volume down button to your device Bootloader Menu or you can enter the following directions into your terminal or command prompt.
Run the following direction to ensure your device is properly associated with your PC. On the off chance that it restores a series of characters, it implies that you are good to go to begin refreshing your device.
./adb device
Presently to go into the Bootloader menu simply run the following order.
./adb reboot bootloader
At the base of the screen, there will be a few things recorded including the lock state of the device. This should state bolted except if you have opened your bootloader before and never returned and bolted it again.
To open your bootloader, which is required just when blazing a stock firmware picture, you should enter the following directions. Keep in mind that while opening your phone’s bootloader it will factory reset your device, so you will lose everything put away on it. On the off chance that you have not yet backup anything imperative on your device, you can hit the power button while Start is featured in the Bootloader menu and this will boot you once more into your device like ordinary. Presently back to opening your bootloader.
Presently type:
./fastboot blazing open
A dialog will show up on the device inquiring as to whether you are certain about the opening. Again this will factory reset your device, so on the off chance that you need to pull out of the procedure, you simply need to choose no with the power button. On the off chance that you are prepared to open your bootloader you, press the volume up button and afterward the power button to affirm that you wish to open your bootloader.
./fastboot reboot-bootloader
It is prescribed to reboot the bootloader just to give itself a check to ensure everything is working effectively before proceeding onward to the next stage.
Blazing the stock picture or OTA update
Presently that your bootloader is opened, it’s a great opportunity to flash the new firmware. To discover the pictures, head on over to the Android Q Factory Images page, discover your device, and download the most recent picture. It is easier to then uncompress the record in the Platform Tools organizer you downloaded with the goal that you don’t need to type the way to the diverse documents when blazing the firmware.
To start, ensure you are still in the bootloader menu on your device and twofold watch that your bootloader is in certainty opened.
To start with, ensure that your PC is communicating accurately with your phone or tablet. For whatever length of time that your device serial number returns as an associated device, you are prepared to start refreshing your device.
Also Read: How to Charge Your Android Phone Battery Faster than Usual?
./fastboot device
When you’ve checked that the phone and the PC can impart the manner in which they have to, you can get to blazing.
Glimmering a full Factory Image
In the first place, you’ll have to flash the refreshed bootloader with the following order.
./fastboot streak bootloader [bootloader file].img
You won’t see anything on the screen of your device however there should be an exchange in your terminal or direction brief. When it is finished flashing the bootloader you should reboot once again into the bootloader to ensure everything is as yet working accurately.
./fastboot reboot-bootloader
Next, you flash the refreshed radios. This step is just vital in the event that you are refreshing the firmware of a phone or tablet that has cell radios incorporated with it.
./fastboot streak radio [radio file].img
./fastboot reboot-bootloader
At long last, it’s an ideal opportunity to flash the real framework picture to your phone or tablet.
./fastboot – w update [image file].zip
At the point when this is done, your phone will restart itself and boot up normally. As this procedure clears all information from your device, it will take slightly longer for your device to boot up out of the blue. When you have been welcomed with the device setup walkthrough process, you realize you have effectively flashed another version of the firmware.
On the off chance that you would prefer not to enter the directions manually, there are contents incorporated into the folders containing the framework picture that will do most however not the majority of the truly difficult work for you. The flash all content documents will automate the blazing of the bootloader, radios, and the framework picture. The issue with this procedure is that you should initially ensure that your phone is in the bootloader menu and its bootloader must be opened before beginning the content. Obviously, if these are not officially done the content will neglect to run and nothing will occur.
Returning to Pie

On the off chance that your phone is going crazy or you simply need to return to Pie, it’s unquestionably possible. The procedure is simple, and you simply figured out how to do it! Essentially revisit similar strides above, with the exception of two changes: you don’t have to open your bootloader once more, and you’ll need to download the Pie factory image from Google.